经过差不多半年的磨蹭,博客的V2版本总算是定型上线。一开始我的想法是直接将博客文件放在网站仓库里,不过这个方案会导致网页源码与博客内容混在一起,后续如果想回退网站的版本就会遇上麻烦。因此,目前网站仓库将博客文件夹设置为了私人的git submodule,将两者分开管理。
规划完毕,部署网页成了下一个问题。GitHub Docs原文这样写:
If the repository for your GitHub Pages site contains submodules, their contents will automatically be pulled in when your site is built.
You can only use submodules that point to public repositories, because the GitHub Pages server cannot access private repositories.
也就是说,直接使用一个私有的git submodule然后部署是不现实的,因为理论上GitHub Pages的服务器需要有访问该仓库的权限,但私有仓库并不能被随意访问。
那么是否有其它解决方案呢?我起初参考的Tania的博客中选择把仓库托管在GitHub,而网站部署则交给了Netlify,这样只需一个deploy key即可部署网页。不过我个人不太想再引入第三方托管,因此稍微绕了个弯,也算实现了在GitHub上直接部署的效果。
设置submodule
简而言之,git submodule实现了将一个git仓库视为另一个仓库的子文件夹的功能,同时该文件夹维护着自己的git history。更多的介绍内容可以查阅Git官方文档。
我们首先将我GitHub账号下的私有仓库blog-content添加为网站仓库(后面都称为主仓库)的git submodule。这里由于我想将文件夹名称设置为_post,需要多一个设置名字的指令:
1git submodule add git@github.com:palemoons/palemoons-blog.git _posts将博客内容拉下来后,我们能发现现在的主仓库里多出了一个.gitmodule的文件,记录了刚刚添加的子模块的基本信息,内容如下:
1[submodule "_posts"]
2	path = _posts
3	url = git@github.com:palemoons/palemoons-blog.git
现在一个包含博客内容的网站文件夹已经准备好,文件树简化如下:
1|- _posts
2|- public
3|- src
4|- ... (other website files)
5
如果远程主仓库中已经包含了子模块,那么直接拉下来更新就好:
1git clone git@github.com:palemoons/palemoons.github.io.git
2cd palemoons.github.io && git submodule init && git submodule update
页面部署
现在网站仓库已经托管在了GitHub上,我们需要创建一个新的GitHub Action来进行自动化部署。已经有文档给出了比较详尽的步骤,具体可以参考nextjs-github-pages。
需要特别注意的是,由于GitHub Pages只支持静态页面,构建页面之前需要配置为静态导出(static export):
1// next.config.js
2module.exports = {
3  output: "export",
4  basePath: isProd ? "/palemoons.github.io" : "", // slug of my GitHub repository
5  images: {
6    //Next.js does not support dynamic features with static exports.
7    unoptimized: true,
8  },
9};另外,该教程里给出的deploy.yml文件是假设博客文本已经存放在网站仓库里,因此需要额外增加一步,从私有仓库里拉取博客内容(所以网站仓库里跟踪的博客内容版本已经不重要了,因为每次部署的时候我们实际上都在服务器上进行过一次内容拉取)。这个小技巧已经有前人讨论过很多,例如这个Issue,这里我记录一个自己使用的配置:
1name: Deploy Next.js site to Pages
2
3on:
4  # Runs on pushes targeting the default branch
5  push:
6    branches: ["master"]
7
8  # Allows you to run this workflow manually from the Actions tab
9  workflow_dispatch:
10
11# Sets permissions of the GITHUB_TOKEN to allow deployment to GitHub Pages
12permissions:
13  contents: read
14  pages: write
15  id-token: write
16
17# Allow only one concurrent deployment, skipping runs queued between the run in-progress and latest queued.
18# However, do NOT cancel in-progress runs as we want to allow these production deployments to complete.
19concurrency:
20  group: "pages"
21  cancel-in-progress: false
22
23jobs:
24  # Clean existing deployments
25  cleanup:
26    runs-on: ubuntu-latest
27    permissions: write-all
28
29    steps:
30      - name: Delete deployment
31        uses: strumwolf/delete-deployment-environment@v2
32        with:
33          token: ${{ secrets.GITHUB_TOKEN }}
34          environment: github-pages
35          onlyRemoveDeployments: true
36  # Build job
37  build:
38    runs-on: ubuntu-latest
39    steps:
40      - name: Clone main repository
41        uses: actions/checkout@v4
42
43      - name: Add SSH private keys for submodule repositories
44        uses: webfactory/ssh-agent@v0.9.0
45        with:
46          ssh-private-key: ${{ secrets.SUBMODULE_CONTENT_PULL_KEY }}
47
48      - name: Clone Blog Content
49        run: git submodule update --init --recursive --remote
50
51      - name: Detect package manager
52        id: detect-package-manager
53        run: |
54          if [ -f "${{ github.workspace }}/yarn.lock" ]; then
55            echo "manager=yarn" >> $GITHUB_OUTPUT
56            echo "command=install" >> $GITHUB_OUTPUT
57            echo "runner=yarn" >> $GITHUB_OUTPUT
58            exit 0
59          elif [ -f "${{ github.workspace }}/package.json" ]; then
60            echo "manager=npm" >> $GITHUB_OUTPUT
61            echo "command=ci" >> $GITHUB_OUTPUT
62            echo "runner=npm" >> $GITHUB_OUTPUT
63            exit 0
64          else
65            echo "Unable to determine package manager"
66            exit 1
67          fi
68
69      - name: Setup Node
70        uses: actions/setup-node@v4
71        with:
72          node-version: "lts/*"
73          cache: ${{ steps.detect-package-manager.outputs.manager }}
74
75      - name: Setup Pages
76        uses: actions/configure-pages@v4
77
78      - name: Restore cache
79        uses: actions/cache@v4
80        with:
81          path: |
82            .next/cache
83          # Generate a new cache whenever packages or source files change.
84          key: ${{ runner.os }}-nextjs-${{ hashFiles('**/package-lock.json', '**/yarn.lock') }}-${{ hashFiles('**.[jt]s', '**.[jt]sx') }}
85          # If source files changed but packages didn't, rebuild from a prior cache.
86          restore-keys: |
87            ${{ runner.os }}-nextjs-${{ hashFiles('**/package-lock.json', '**/yarn.lock') }}-
88
89      - name: Install dependencies
90        run: ${{ steps.detect-package-manager.outputs.manager }} ${{ steps.detect-package-manager.outputs.command }}
91
92      - name: Build with Next.js
93        run: ${{ steps.detect-package-manager.outputs.runner }} run build
94
95      - name: Upload artifact
96        uses: actions/upload-pages-artifact@v3
97        with:
98          path: ./out
99
100  # Deployment job
101  deploy:
102    environment:
103      name: github-pages
104      url: ${{ steps.deployment.outputs.page_url }}
105    runs-on: ubuntu-latest
106    needs: [build, cleanup]
107    steps:
108      - name: Deploy to GitHub Pages
109        id: deployment
110 uses: actions/deploy-pages@v4这里最重要的是我们使用了webfactory/ssh-agent@v0.9.0这一action,具体用法可以参考文档。在Add SSH private keys for submodule repositories这一步,我们添加了一个私钥,便于下一步私有子模块的获取和更新。
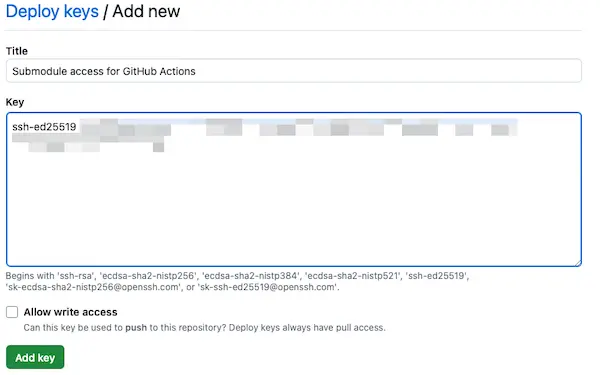
为了达成这一目的,我们首先需要在blog-content仓库中的Settings -> Security -> Deploy keys这里添加一个deploy key,随机生成一个SSH Key后把公钥部分贴进内容。

接着,在博客仓库中的Settings -> Security -> Secrets and variables中添加一个新的repository secret,这里我们设置名称为SUBMODULE_CONTENT_PULL_KEY,并将私钥内容粘贴进去。

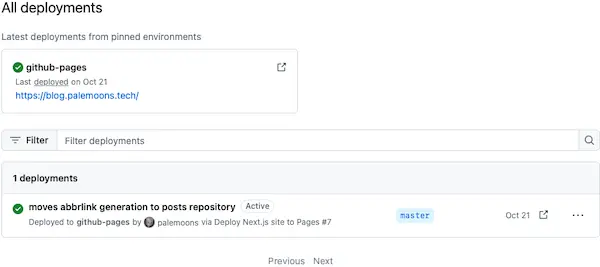
除此之外,为了清理过去的部署结果,我们额外添加了一步cleanup。这样首页中的Deployments就只留下正在运行的页面。
最后,只需要推送更新到仓库,网页部署就可以自动进行。
